August 8, 2024
Improving the Quality and Speed of Alloy Die Casting Products in the Auto Sector See the articleAs application engineers at Creaform, we were invited to take part in an interesting mandate in the United Kingdom, more precisely at the Birchwood head office of ESR Technology near Warrington.
HOIS is an international joint industry project between oil & gas companies and their inspection vendors. HOIS aims to be the prime industry forum for discussing inspection issues and developing and exploiting new or improved inspection technology. Thus, we were there to evaluate the Creaform technology as part of a specific project.
The project
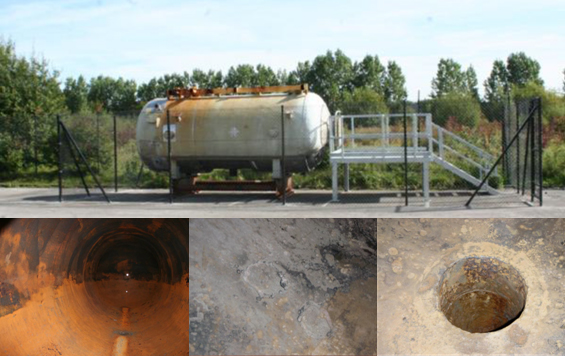
The project consisted in finding more effective methods and equipment to improve the inspection of corrosion found inside a specific vessel. The cylindrical pressure vessel was 2 m (about 6.5ft) in diameter and almost 6 m (about 19.4ft) long. Substantial corrosion had accumulated inside during its years of service. The corrosion was covering almost the entire inferior half. We suggested using the Pipecheck solution along with Creaform 3D scanning technology, to benefit from the Pipecheck expertise in oil & gas Non-Destructive Testing (NDT) applications.
The challenges
There were several challenges: first, the confined space, and the higher risks associated with it. Second, a large area to inspect, with corrosion spread throughout the entire surface instead of being localized. To carry on the task, we planned 2 days, in case we encounter unexpected situations.
Since security is always the first priority, prior to the travel we had gone through training about confined spaces, to be aware of the dangers related to this type of work, and to learn about taking appropriate measures to minimize the risks. While working, we also wore all the required personal protection equipment, from steel toe boots to a hard hat!
The work was conducted with the Creaform Pipecheck solution and the Handyscan 3D scanner. Thanks to the unique Creaform TRUaccuracy technology, we were able to accurately scan the entire inferior surface even with the vibrations generated by moving inside the tank.
Using the MaxSHOT 3D additionally enabled us to increase the volumetric accuracy of the Handyscan 3D over large parts. This optional procedure is only required to measure geometrical deformations with very high accuracy on a large object.
The execution
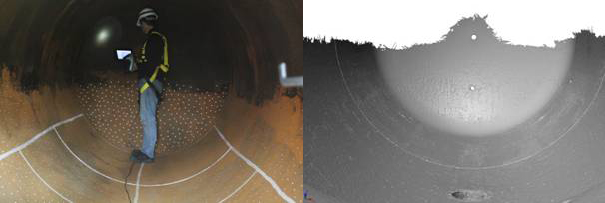
We started the work by placing the positioning targets to cover the corroded area, then placed the coded targets required by the MaxSHOT 3D. Using the feedback of the VXelements VXshot module, we captured various shots with the MaxSHOT 3D from different point of views and obtained a highly accurate 3D model of the positioning targets. With that 3D model acquired, we were ready to scan.
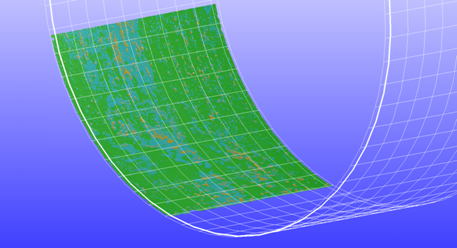
At this stage the rugged field pack was very handy! Instead of bringing all the equipment (computer, power supply, mouse, etc.) inside the pressure vessel, we only went in with the Handyscan 3D and the wireless tablet, each with their own magnetic stands. We performed the scan with a 1mm resolution, in 16 different sessions. After the scan was completed, we used Pipecheck to merge all sessions into one larger scan, making it possible to analyse the various sections altogether. Pipecheck automatically measured material loss depth over the entire surface, checked the proximity between corrosion for interaction and evaluated burst pressure (code complying with ASME B31G), all in one click. The generation of a complete Excel report was just another click away.
In the end, since no unexpected situations occurred and there were still some time left, we were able to cover more than twice the surface required. The required area would have been done within a single day… Whereas with the traditional pit gauge method, just the 1-inch gridding would have taken at least a day, after which the deepest point in all of the 43 000 squares would have had to be found and manually measured! And after that, another lengthy step: the complex analysis of applying the interaction rule, finding the worst case profile of the depth for each corroded area and calculating burst pressure.
In conclusion, the Pipecheck solution proved to be a huge improvement over other traditional Non-Destructive Testing (NDT) techniques such as the pit gauge for corrosion inspection on pressurized components. It can drastically reduce the inspection time with highly repeatable and accurate results (50 microns).
We were glad to have the right tools for the job, and to be able to do it well and as quickly as possible, because as much as we appreciate the experience of working in confined spaces, the less time spend in the pressure vessel, the better!
To learn more about Pipecheck , the software platform addressing both corrosion and mechanical damage assessment, you can visit Pipecheck’s product page.


6 Jul '15
dashinspectorate
Thanks to sharing such a great information. It is very useful and informative. Dash Inspectorate