6 mai 2013
We have launched today the MetraSCAN-R series of robot-mounted optical CMM 3D scanners for automated inspection on and off the production line. The devices will be world premiered at the CONTROL tradeshow held next week in Stuttgart, Germany (Hall 5, booth #5108).
Manufacturers trying to remain competitive are facing major challenges, as they have to answer to a demand for more complex and superior quality products and deliver them within ever shortened turnarounds and production cycles. In this context and with existing measurement technology, they are struggling to achieve high level of accuracy when it comes to inspecting their parts to guarantee fabrication quality.
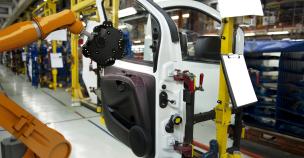
Creaform addressed this issue and is now presenting manufacturers with a robot-mounted scanner that can inspect a wide range of parts directly on the shop floor, thanks to the TRUaccuracyTM technology and extensible measurement volume. The device’s scanning speed and the fact that is it mountable on robot make it possible to inspect directly on the production line.
“There was a definite lack in the manufacturing industry for accurate and reliable devices to carry out automated on- and off-line 3D inspection processes on complex parts, explains Jean‑François Larue, product director for the MetraSCAN-R series. High-rate serial production processes require fast 3D measurement systems that can inspect a part and deliver a conformity status within a typical cycle time. For us, it was obvious that a scanning device insensitive to shop floor conditions was the way to go.”
Solution for automated 3D inspection on the shop floor
With the MetraSCAN-R series, Creaform is expanding its range of solutions for inspection applications dedicated to the industrial/manufacturing sectors. The scanners are offered in two versions (70-R and 210-R) and designed for automated and robotized inspection applications such as on-line inspection in mass production (up to a few hundreds parts a day), on-line inspection of parts ranging from 0.5 to 3 meters in size, part-to-CAD analysis, supplier product quality inspection, conformity assessment of 3D models against original parts / production tooling or manufactured parts against originals.
Benefits of the MetraSCAN-R 3D Scanners
- Fast: Inspection of up to a few hundred parts per day, directly on the production line.
- Highly-accurate measurements: The TRUaccuracy technology guarantees accuracy of up to 0.085 mm in real-life, shop floor conditions (no matter instability, vibrations, thermal variation, etc.). Accuracy is determined by the optical CMM scanner and is independent from the robot.
- Dynamic referencing: With the C-Track’s dynamic referencing mode, the coordinate system can be literally “locked” onto the part being measured, thus maintaining part alignment during the entire scanning process.
- Automatic alignment: Instant and reliable alignment phase. Optical reflectors allow automatic detection of the part alignment.
- Versatility: The solution can be fully configured and programmed (inspection programs) to meet inspection automation projects requirements for parts of various sizes and shapes.
Compatibility
As for now, the MetraSCAN-R are compatible with robot KR5 Arc / KRC4 from KUKA and Metrologic’s X4 iRobot software only. Efforts are ongoing to expand the range of compatible hardware and software.


